How to clean install NVIDIA drivers: download the correct driver package from NVIDIA, close your open applications, run the installer as administrator, choose Custom (Advanced), tick Perform a clean installation and restart Windows when it finishes. That is the clean-install method NVIDIA describes in its own support instructions.
A clean install can help when a normal driver installation fails or when you want to reset NVIDIA’s old settings. Make a note of any custom profiles you may want to restore. You don’t need a separate driver-cleaning utility to use NVIDIA’s built-in method.
How to clean install NVIDIA drivers on Windows 10 and 11
Before you start, save documents and close any running games. You should also close browsers, video players and GPU tuning tools such as MSI Afterburner or other monitoring software. NVIDIA explains that some background programs can interfere with the installer registering its components correctly.
- Identify your exact NVIDIA graphics card. Use Device Manager > Display adapters if you are unsure, then check NVIDIA’s download page for the supported GPU and Windows version.
- Download the appropriate Game Ready or Studio driver directly from NVIDIA. If you have a laptop, check the manufacturer’s recommended driver package as well.
- Find the downloaded installer in File Explorer. Right-click it and select Run as administrator, then approve Windows User Account Control if prompted.
- Leave the proposed temporary extraction folder at the default location unless you have a clear reason to change it.
- At the licence screen, choose the driver components you need. NVIDIA’s support walkthrough shows the Graphics Driver and NVIDIA App option for a full installation.
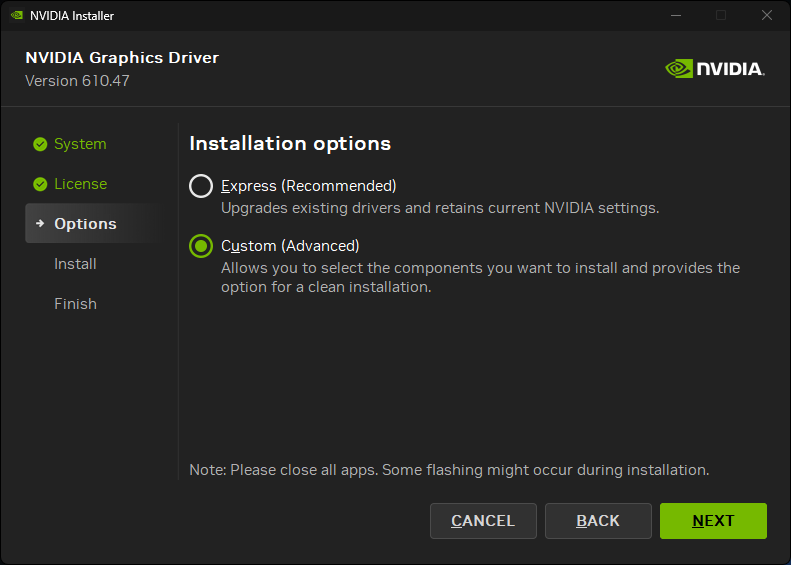
- Choose Custom (Advanced), click Next and wait for the component selection screen.
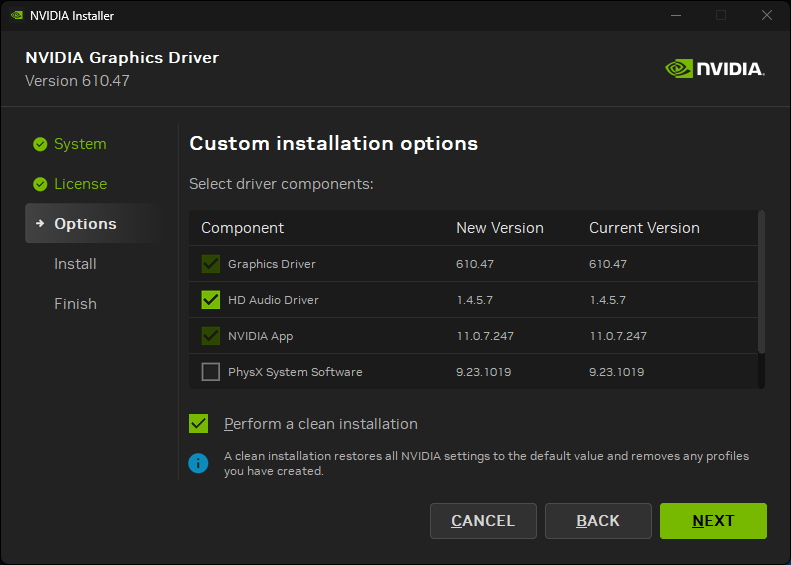
- Tick Perform a clean installation. Continue with Next and allow the installer to finish without launching games in the meantime.
- Restart your computer once installation is complete, even if the desktop is already usable.
That’s the entire process in NVIDIA’s official installer. There is no separate ‘clean’ download. You might see the display flicker or briefly change resolution while the driver is replaced.
How to clean install NVIDIA drivers: where the checkbox is
The checkbox appears in the Custom installation options screen after you choose Custom (Advanced). It is not an option on the initial download page, and you will not find it by opening Windows Settings or changing in-game graphics settings. If you selected the express route, go back in the installer and choose Custom instead.
NVIDIA’s own screenshot shows the checkbox below the list of driver components. The precise component versions shown in the support screenshot are illustrative: your installer may be newer, and the installed version should match the package you actually downloaded.
What does how to clean install NVIDIA drivers reset?
NVIDIA says a clean installation restores driver settings to their defaults and removes custom profiles. If you’ve tuned individual games, make a note of those changes first. You can restore them after the reboot.
The graphics driver is installed system-wide. A clean install is not a per-game troubleshooting toggle, and it will not install a missing game update. For example, if a title requires its own patch to enable a new DLSS feature, changing drivers without that patch will not create the feature.
How to clean install NVIDIA drivers without NVIDIA App
Yes. NVIDIA’s driver download page provides a standalone installer, and the page describes NVIDIA App as an additional installation option. You can obtain and run the graphics driver package without relying on NVIDIA App to handle the download. The exact component choices shown may vary with the package and hardware.
If the NVIDIA App is the part that has stopped working, getting the installer from the official site keeps the driver installation path separate from the app’s download process. Be careful not to click a similarly named third-party program promising to install all drivers automatically.
What to do if the clean installation still fails
If the installer still fails, write down exactly where it stopped. Confirm your GPU model, Windows version and available storage, and check that Windows Update isn’t installing something else. Laptop owners should also check their manufacturer’s driver recommendations.
Look at your actual hardware, operating system build and free storage before assuming the latest driver is compatible. NVIDIA has distinct desktop and notebook support lists and notes that laptop manufacturers offer certified drivers for their own systems. A specialised laptop may need its manufacturer’s package. The steps for how to clean install NVIDIA drivers generally still begin with the official compatible installer, not a third-party utility.
Do not treat Display Driver Uninstaller or registry cleaning as required steps in this walkthrough. NVIDIA’s published manual recovery instructions begin with its own downloaded installer, administrator privileges and the Custom clean-install option. If those steps fail, use NVIDIA Support with the exact error message rather than repeatedly making unrelated system changes.
After you learn how to clean install NVIDIA drivers, check the version
Open NVIDIA App’s Drivers page or NVIDIA Control Panel’s System Information to confirm what Windows is now running. If you followed how to clean install NVIDIA drivers because a particular game was misbehaving, try that same game again and compare the original symptom. Keep the driver version number handy if the problem persists.
Related Guides
For more on how to clean install NVIDIA drivers, see these installation and troubleshooting guides.
Official source: NVIDIA Support: how to manually clean install an NVIDIA graphics driver.