How to use Roblox Studio is much easier to understand once you know what the main tools do and where to start. Roblox Studio lets you build your own Roblox games, add objects and characters, write scripts, test your creations and eventually publish them to Roblox.
If you are completely new to game development, learning how to use Roblox Studio can initially feel overwhelming. There are lots of buttons, windows and tools on the screen, but you only need a small number of them to start building.
You also don’t need to know how to code before opening Roblox Studio for the first time. You can begin with a simple map, learn the basic building tools and gradually introduce scripting as your game becomes more complicated.
This beginner’s guide explains how to use Roblox Studio from the very beginning, including downloading Studio, starting a project, navigating the editor, adding objects, using Explorer and Properties, testing your game and publishing your first Roblox experience.
What is Roblox Studio?
Roblox Studio is the free development software used to create Roblox experiences. It includes tools for building 3D environments, scripting gameplay, testing games and publishing them to Roblox.
Unlike the standard Roblox app, which is primarily used to play experiences, Roblox Studio is designed for creating them.
You can use Roblox Studio to make everything from a small obstacle course to a much larger multiplayer experience.
| Roblox Studio feature | What it does |
|---|---|
| 3D viewport | Shows the world you are building |
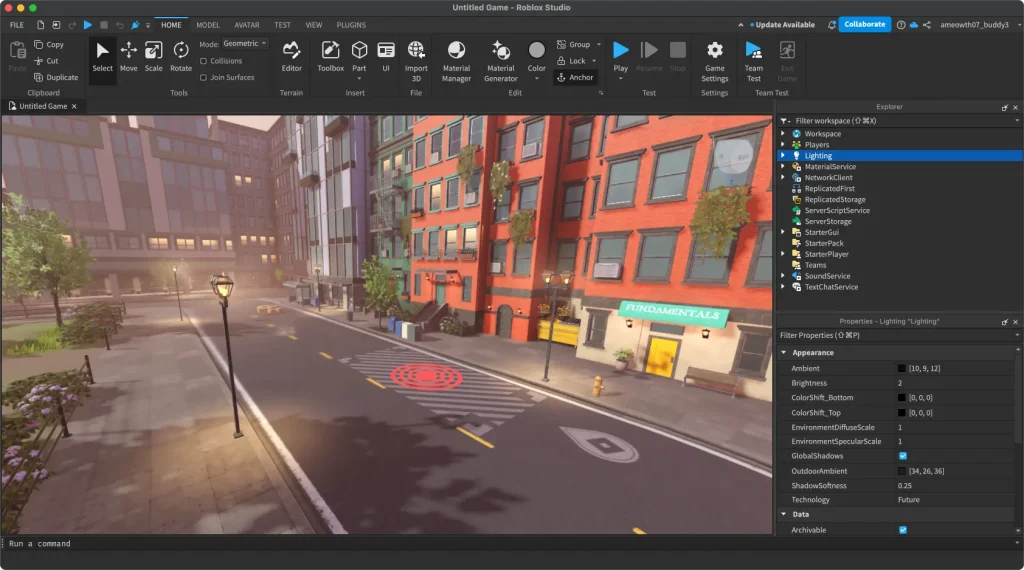
| Explorer | Shows objects and services inside your game |
| Properties | Lets you change settings for selected objects |
| Toolbox | Provides access to models and other assets |
| Script Editor | Lets you create and edit Luau scripts |
| Testing tools | Let you play and test your game |
| Publishing tools | Let you publish your experience to Roblox |
Understanding these features is one of the first steps when learning how to use Roblox Studio.
How to Use Roblox Studio for the First Time
Before worrying about scripts or complicated game mechanics, spend a little time getting familiar with the Studio interface.
When you open a project, the large 3D area in the centre of Studio displays your game world. Around it are the tools and panels used to build and manage your experience.
The easiest way to learn how to use Roblox Studio is to start with a simple project and experiment with individual tools rather than trying to understand the entire program immediately.
Add a basic part, move it around, change its size and test the game. Once those basic actions feel comfortable, you can start adding more features.
How to Download Roblox Studio
Before you can learn how to use Roblox Studio, you need to install the software on your computer.
Roblox Studio is available for Windows and Mac.
To install Roblox Studio:
- Visit the Roblox Creator Hub.
- Choose the option to download Studio.
- Download the Roblox Studio installer.
- Open the downloaded installer.
- Complete the installation process.
- Launch Roblox Studio.
- Sign in with your Roblox account.
On Windows, the downloaded installer is RobloxStudio.exe, while the Mac installer uses the RobloxStudio.dmg file format.
Once installation is complete, you can open Studio and create your first project.
How to Start a Game in Roblox Studio
When you open Roblox Studio, you can begin a new experience using one of the available starting templates.
A Baseplate provides a relatively empty environment, making it useful when you want to experiment with building from scratch.
Other templates provide more of a starting point. Roblox also uses a Classic Obby template as part of its beginner learning material.
If you are learning how to use Roblox Studio, don’t worry about creating a huge game immediately. Starting with a small project makes it much easier to understand what each tool does.
How to Move Around Roblox Studio
Getting comfortable with the camera is an important part of learning how to use Roblox Studio.
The main area displaying your game world is called the 3D viewport. This is where you can view your environment, select objects and build your map.
You can navigate around the 3D environment using your keyboard and mouse.
If you have never used 3D creation software before, camera movement can take a little practice. Spend a few minutes moving around a Baseplate before attempting to build anything complicated.
Once navigating the map becomes natural, building becomes considerably easier.
How to Add Parts in Roblox Studio
Parts are some of the basic building blocks used to create Roblox environments.
You can use parts to make floors, walls, platforms, obstacles and many other objects.
After inserting a part, Studio provides several tools for changing it.
| Tool | What it does |
|---|---|
| Move | Changes the position of an object |
| Scale | Changes the size of an object |
| Rotate | Changes the angle of an object |
Learning to use Move, Scale and Rotate is an essential part of understanding how to use Roblox Studio.
For example, you can insert a basic block, make it wider with Scale and move it above the ground to create a platform.
Create several platforms and you already have the beginnings of a simple Roblox obby.
How to Use Explorer in Roblox Studio
Explorer shows the hierarchy of objects and services contained within your Roblox experience.
Understanding Explorer is particularly important when learning how to use Roblox Studio because projects quickly become difficult to manage if you don’t know where objects are located.
One of the areas you will frequently encounter is Workspace. Objects that exist within the game’s 3D world are generally found here.
If you insert a basic part into your map and then look inside Workspace in Explorer, you should see the part listed.
As your project grows, Explorer may contain parts, models, scripts and many other objects.
Think of Explorer as a way of seeing the structure behind your Roblox game rather than only looking at the objects visible on screen.
How to Use Properties in Roblox Studio
The Properties window displays information and editable settings for the object you currently have selected.
For example, selecting a part allows you to view and change properties associated with that object.
Explorer and Properties therefore work closely together.
Explorer helps you find an object. Properties helps you change it.
Remembering that distinction makes learning how to use Roblox Studio considerably easier.
As you become more comfortable with Studio, you will use the Properties window frequently rather than relying only on the visual building tools.
How to Use the Toolbox in Roblox Studio
The Toolbox gives creators access to assets that can be used within Roblox Studio projects.
This includes content available through Roblox’s Creator Store.
Toolbox assets can be particularly useful when learning how to use Roblox Studio, as they allow you to experiment with existing objects rather than building everything yourself.
However, pay attention to what you insert into a project. Models can contain scripts as well as visible objects.
Roblox provides an option to disable scripts contained within an inserted asset, allowing you to use an asset without automatically running its included scripts.
Do You Need Coding to Use Roblox Studio?
No. You can learn how to use Roblox Studio and begin building without knowing how to code.
Basic building tools allow you to create maps, platforms, structures and environments without writing scripts.
Coding becomes important when you want objects and systems within your game to perform more advanced actions.
Roblox scripting uses a programming language called Luau.
Scripts can be used for features such as interactive objects, changing platforms, game systems, doors, shops and many other mechanics.
If you have never programmed before, don’t try to learn everything at once. Build something simple and learn individual scripting concepts when your project needs them.
How to Test Your Game in Roblox Studio
Testing is another important part of learning how to use Roblox Studio.
Studio includes testing tools that allow you to run your experience without releasing every change publicly.
Regular testing can help you check:
- whether platforms can actually be reached
- whether your character spawns correctly
- whether scripts work
- whether obstacles behave as intended
- whether players can get stuck
- whether your map is enjoyable to navigate
Test your project frequently rather than waiting until you have built an entire game.
Finding a problem after adding one feature is much easier than trying to identify it after adding 50.
How to Stop Testing in Roblox Studio
When you start a playtest, Studio temporarily runs your game so you can experience it as a player.
Once you have finished testing, stop the playtest before returning to normal editing.
This is important because editing during a playtest isn’t the same as making permanent changes to the project.
If certain Studio options appear unavailable, check whether you are still running a test session before assuming something is broken.
How to Save Your Roblox Studio Game
Saving regularly is essential when learning how to use Roblox Studio.
Roblox recommends publishing frequently, particularly after making important changes to your project.
You can use File > Publish to Roblox to publish your project to your Roblox account as an experience.
Don’t wait until you think the entire game is finished before saving your work.
Developing a Roblox experience can involve lots of small changes, so saving and publishing regularly reduces the chance of losing significant progress.
How to Publish a Game on Roblox
Once you have created something you want to keep, you can publish your experience to Roblox.
In Roblox Studio:
- Open File.
- Select Publish to Roblox.
- Enter the requested information about your experience.
- Give the experience a suitable name.
- Complete the publishing process.
A newly created Roblox experience begins with a single place. More complicated experiences can contain multiple places, but this isn’t something you need to worry about when first learning how to use Roblox Studio.
You can continue developing and updating an experience after its initial creation.
What Should You Make First in Roblox Studio?
A small obstacle course, commonly known as an obby, is an excellent first project.
It allows you to practise many of the skills involved in learning how to use Roblox Studio without needing to create a complicated game.
For a beginner obby, you could learn how to:
- Create platforms.
- Move and resize parts.
- Rotate obstacles.
- Add a spawn point.
- Create a kill brick.
- Add checkpoints.
- Build moving platforms.
- Test jumps and obstacles.
- Create a finish area.
- Publish the finished experience.
Roblox itself uses a Classic Obby in its beginner building curriculum, making an obstacle course a sensible first project.
Is Roblox Studio Free?
Yes. Roblox Studio is free to use.
You do not need to purchase Roblox Studio to begin creating games, and the software can be downloaded through Roblox’s Creator Hub.
Some parts of the wider Roblox creator ecosystem can involve paid assets or monetization, but Roblox Studio itself does not require you to purchase the development software.
That makes experimenting with how to use Roblox Studio accessible even if you have never tried game development before.
Can You Use Roblox Studio on a Phone?
Roblox Studio and the standard Roblox mobile app are different products.
Studio is Roblox’s full development environment, while Roblox has also introduced newer creation tools that approach game creation differently.
In particular, Roblox Build provides an AI-assisted creation system separate from traditional Roblox Studio development.
If you are trying to decide which one you need, our Roblox Build vs Roblox Studio guide explains the differences between the two creation tools.
Is Roblox Studio Difficult to Learn?
Roblox Studio can look complicated the first time you open it because many tools and panels are visible at once.
The trick to learning how to use Roblox Studio is not trying to understand everything immediately.
Concentrate on the essentials first.
| Learn first | Why it matters |
|---|---|
| Camera controls | Lets you navigate the map |
| Move, Scale and Rotate | Covers basic object editing |
| Explorer | Helps you locate objects |
| Properties | Lets you change object settings |
| Parts | Provides basic building blocks |
| Playtesting | Lets you check your work |
| Publishing | Saves and publishes your creation |
| Basic Luau scripting | Adds gameplay and interactions |
Once these tools make sense, you can gradually explore more advanced features.
Learning How to Use Roblox Studio Step by Step
The easiest way to learn how to use Roblox Studio is by actually creating something.
Start with a Baseplate or simple obby and practise moving, scaling and rotating objects. Then learn how Explorer and Properties work, test your creation and save your progress.
Once the basic building tools feel comfortable, begin experimenting with individual gameplay features.
You might learn how to create a kill brick one day, add checkpoints the next and then try your first simple Luau script.
You do not need to master every Studio feature before creating your first game.
Learning how to use Roblox Studio one tool at a time gives you a much easier route into Roblox development, and even a very simple first project can teach you the fundamentals needed to start creating bigger experiences.