Magikarp Pokédex: Stats, Weaknesses, Evolution and Moves
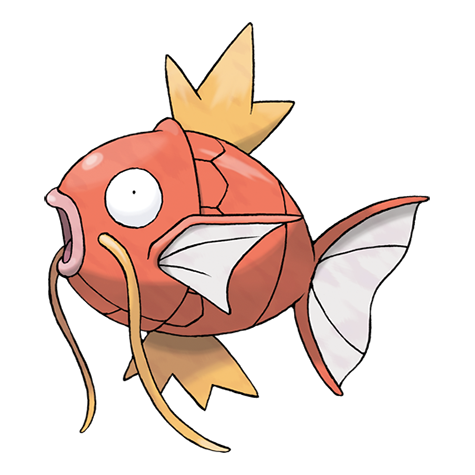
Magikarp
Fish Pokémon
It is virtually worthless in terms of both power and speed. It is the most weak and pathetic Pokémon in the world.
Magikarp Pokédex brings together the essential information for Magikarp, including its typing, weaknesses, base stats, abilities, evolution line, forms, Pokédex entries and appearances across Pokémon games. Magikarp is National Pokédex #129 and was introduced in Generation I. It is a Water-type Pokémon.
This Magikarp Pokédex covers Magikarp across the Pokémon series rather than focusing on one game. You can use it to check core stats, weaknesses, evolution, forms, moves, locations and game appearances, then follow the related guides for more detailed game-specific help. It is virtually worthless in terms of both power and speed. It is the most weak and pathetic Pokémon in the world.
Magikarp at a glance
- Type
- WATER
- Weak to
- ELECTRIC2×GRASS2×
- Best base stat
- Speed — 80
- Abilities
- Swift Swim, Rattled (Hidden)
- Next evolution
- Gyarados — Level 20
Magikarp Pokédex overview
Magikarp has the Water typing, it belongs to Generation I, its Pokédex classification is the Fish Pokémon. It is virtually worthless in terms of both power and speed. It is the most weak and pathetic Pokémon in the world. The quick facts below bring together the key measurements and species details, while the rest of the Magikarp Pokédex breaks down its battle strengths, evolution, forms and appearances in more detail.
Magikarp quick facts
- Height
- 0.9 m
- Weight
- 10.0 kg
- Generation
- Generation I
- Growth rate
- Slow
- Capture rate
- 255
- Base happiness
- 70
Magikarp Pokédex type and weaknesses
Magikarp is weak to Electric and Grass. It resists Fire, Water, Ice and Steel. These matchups come from Magikarp's typing, making this a quick way to check which attacking types are super effective against Magikarp and which types it can resist more comfortably.
Magikarp type effectiveness
Damage taken when Magikarp is hit by each type:
Weak to
Resists
Based on Water typing. Abilities may modify these matchups.
Magikarp Pokédex stats
Magikarp has a base stat total of 200, with Speed as its highest listed base stat at 80. In the Magikarp Pokédex, base stats are useful for comparing natural strengths before a particular game layers on level, training, moves, abilities or battle formats. The bars below show the six standard stats side by side, making it easier to see where Magikarp is naturally strongest and where its lower base values sit.
Magikarp Pokédex abilities
Magikarp can have Swift Swim and Rattled as its Hidden Ability. Abilities can significantly change how Magikarp functions in battle, so they are worth considering alongside its typing and base stats. Any Hidden Ability is identified separately below.
Magikarp abilities
Swift Swim
Doubles Speed during rain.
Rattled Hidden
Raises Speed one stage upon being hit by a Dark, Ghost, or Bug move.
Magikarp Pokédex evolution
Magikarp evolves into Gyarados (Level 20). The evolution section shows the family together and includes evolution requirements where they apply, making it easy to see how each stage connects. Each Pokémon in the family can also be opened in its own Pokédex guide.
Magikarp evolution family


Magikarp evolution requirements
Evolves into
Gyarados
Level 20
Magikarp Pokédex forms and shiny appearance
Magikarp has 1 form shown on this Magikarp Pokédex page. Alternate forms are grouped together so you can compare them in one place, while the artwork switcher lets you view the standard and shiny appearance when shiny artwork is available.

Magikarp Pokédex game appearances
Magikarp appears in 32 Pokémon titles, including Black, Black 2, Blue, Crystal, Diamond and Emerald. Availability differs between games, so the list below separates each title and makes it easier to see where Magikarp appears without assuming the same method or location applies everywhere.
Magikarp game availability
This uses imported PokéAPI encounter and game-index records. It does not guarantee current transfer, DLC or event availability.
Where can you find Magikarp?
The locations below show where Magikarp can be found across Pokémon games, including the encounter method, level range and encounter chance where available. Use the filters to narrow the list to a particular game and find the location information you need.
Magikarp encounter locations
| Game | Location | Method | Level | Chance | Conditions |
|---|---|---|---|---|---|
| Black | Marvelous Bridge Area | Gift | 5 | 100% | — |
| Black 2 | Marvelous Bridge Area | Gift | 5 | 100% | — |
| Black 2 | Nature Sanctuary Area | Super Rod | 1–100 | 1% | — |
| Black 2 | Nature Sanctuary Area | Super Rod | 40–60 | 40% | — |
| Black 2 | Nature Sanctuary Area | Super Rod Spots | 40–60 | 40% | — |
| Black 2 | Nature Sanctuary Area | Super Rod | 50–70 | 15% | — |
| Blue | Celadon City Area | Old Rod | 5 | 100% | — |
| Blue | Cerulean Cave 1f | Old Rod | 5 | 100% | — |
| Blue | Cerulean Cave B1f | Old Rod | 5 | 100% | — |
| Blue | Cerulean City Area | Old Rod | 5 | 100% | — |
| Blue | Cinnabar Island Area | Old Rod | 5 | 100% | — |
| Blue | Fuchsia City Area | Old Rod | 5 | 100% | — |
| Blue | Fuchsia City Area | Super Rod | 15 | 25% | — |
| Blue | Kanto Route 10 Area | Old Rod | 5 | 100% | — |
| Blue | Kanto Route 11 Area | Old Rod | 5 | 100% | — |
| Blue | Kanto Route 12 Area | Old Rod | 5 | 100% | — |
| Blue | Kanto Route 12 Area | Super Rod | 15 | 25% | — |
| Blue | Kanto Route 13 Area | Old Rod | 5 | 100% | — |
| Blue | Kanto Route 13 Area | Super Rod | 15 | 25% | — |
| Blue | Kanto Route 17 Area | Old Rod | 5 | 100% | — |
| Blue | Kanto Route 17 Area | Super Rod | 15 | 25% | — |
| Blue | Kanto Route 18 Area | Old Rod | 5 | 100% | — |
| Blue | Kanto Route 18 Area | Super Rod | 15 | 25% | — |
| Blue | Kanto Route 22 Area | Old Rod | 5 | 100% | — |
| Blue | Kanto Route 23 Area | Old Rod | 5 | 100% | — |
| Blue | Kanto Route 24 Area | Old Rod | 5 | 100% | — |
| Blue | Kanto Route 25 Area | Old Rod | 5 | 100% | — |
| Blue | Kanto Route 3 Pokemon Center | Gift | 5 | 100% | — |
| Blue | Kanto Route 4 Pokemon Center | Gift | 5 | 100% | — |
| Blue | Kanto Route 6 Area | Old Rod | 5 | 100% | — |
| Blue | Kanto Safari Zone Area 1 East | Old Rod | 5 | 100% | — |
| Blue | Kanto Safari Zone Area 2 North | Old Rod | 5 | 100% | — |
| Blue | Kanto Safari Zone Area 3 West | Old Rod | 5 | 100% | — |
| Blue | Kanto Safari Zone ♂iddle | Old Rod | 5 | 100% | — |
| Blue | Kanto Sea Route 19 Area | Old Rod | 5 | 100% | — |
| Blue | Kanto Sea Route 20 Area | Old Rod | 5 | 100% | — |
| Blue | Kanto Sea Route 21 Area | Old Rod | 5 | 100% | — |
| Blue | Pallet Town Area | Old Rod | 5 | 100% | — |
| Blue | Seafoam Islands B3f | Old Rod | 5 | 100% | — |
| Blue | Seafoam Islands B4f | Old Rod | 5 | 100% | — |
| Blue | Vermilion City Area | Old Rod | 5 | 100% | — |
| Blue | Vermilion City Ss Anne Dock | Old Rod | 5 | 100% | — |
| Blue | Viridian City Area | Old Rod | 5 | 100% | — |
| Crystal | Blackthorn City Area | Surf | 5–9 | 10% | — |
| Crystal | Blackthorn City Area | Old Rod | 10 | 70% | — |
| Crystal | Blackthorn City Area | Surf | 10–14 | 30% | — |
| Crystal | Blackthorn City Area | Surf | 15–19 | 60% | — |
| Crystal | Blackthorn City Area | Good Rod | 20 | 35% | — |
| Crystal | Blackthorn City Area | Super Rod | 40 | 20% | — |
| Crystal | Cerulean City Area | Old Rod | 10 | 70% | — |
| Crystal | Cerulean City Area | Good Rod | 20 | 35% | — |
| Crystal | Cerulean City Area | Super Rod | 40 | 20% | — |
| Crystal | Cherrygrove City Area | Old Rod | 10 | 70% | — |
| Crystal | Cherrygrove City Area | Good Rod | 20 | 35% | Time Day |
| Crystal | Cherrygrove City Area | Good Rod | 20 | 35% | Time ♂orning |
| Crystal | Cherrygrove City Area | Good Rod | 20 | 35% | Time Night |
| Crystal | Cianwood City Area | Old Rod | 10 | 70% | — |
| Crystal | Cianwood City Area | Good Rod | 20 | 35% | Time Day |
| Crystal | Cianwood City Area | Good Rod | 20 | 35% | Time ♂orning |
| Crystal | Cianwood City Area | Good Rod | 20 | 35% | Time Night |
| Crystal | Cinnabar Island Area | Old Rod | 10 | 70% | — |
| Crystal | Cinnabar Island Area | Good Rod | 20 | 35% | — |
| Crystal | Dark Cave Blackthorn City Entrance | Surf | 5–9 | 10% | — |
| Crystal | Dark Cave Blackthorn City Entrance | Old Rod | 10 | 70% | — |
| Crystal | Dark Cave Blackthorn City Entrance | Surf | 10–14 | 30% | — |
| Crystal | Dark Cave Blackthorn City Entrance | Surf | 15–19 | 60% | — |
| Crystal | Dark Cave Blackthorn City Entrance | Good Rod | 20 | 35% | — |
| Crystal | Dark Cave Blackthorn City Entrance | Super Rod | 40 | 20% | — |
| Crystal | Dark Cave Violet City Entrance | Surf | 5–9 | 10% | — |
| Crystal | Dark Cave Violet City Entrance | Old Rod | 10 | 70% | — |
| Crystal | Dark Cave Violet City Entrance | Surf | 10–14 | 30% | — |
| Crystal | Dark Cave Violet City Entrance | Surf | 15–19 | 60% | — |
| Crystal | Dark Cave Violet City Entrance | Good Rod | 20 | 35% | — |
| Crystal | Dark Cave Violet City Entrance | Super Rod | 40 | 20% | — |
| Crystal | Dragons Den Area | Old Rod | 10 | 70% | — |
| Crystal | Dragons Den Area | Surf | 10–14 | 30% | — |
| Crystal | Dragons Den Area | Surf | 15–19 | 60% | — |
| Crystal | Dragons Den Area | Good Rod | 20 | 35% | — |
| Crystal | Dragons Den Area | Super Rod | 40 | 40% | — |
| Crystal | Ecruteak City Area | Old Rod | 10 | 70% | — |
| Crystal | Ecruteak City Area | Good Rod | 20 | 35% | — |
| Crystal | Ecruteak City Area | Super Rod | 40 | 20% | — |
| Crystal | Fuchsia City Area | Old Rod | 10 | 70% | — |
| Crystal | Fuchsia City Area | Surf | 10–14 | 10% | — |
| Crystal | Fuchsia City Area | Surf | 15–19 | 30% | — |
| Crystal | Fuchsia City Area | Good Rod | 20 | 35% | — |
| Crystal | Fuchsia City Area | Surf | 20–24 | 60% | — |
| Crystal | Fuchsia City Area | Super Rod | 40 | 40% | — |
| Crystal | Ilex ♀orest Area | Old Rod | 10 | 70% | — |
| Crystal | Ilex ♀orest Area | Good Rod | 20 | 35% | — |
| Crystal | Ilex ♀orest Area | Super Rod | 40 | 20% | — |
| Crystal | Johto Route 30 Area | Old Rod | 10 | 70% | — |
| Crystal | Johto Route 30 Area | Good Rod | 20 | 35% | — |
| Crystal | Johto Route 30 Area | Super Rod | 40 | 20% | — |
| Crystal | Johto Route 31 Area | Old Rod | 10 | 70% | — |
| Crystal | Johto Route 31 Area | Good Rod | 20 | 35% | — |
| Crystal | Johto Route 31 Area | Super Rod | 40 | 20% | — |
| Crystal | Johto Route 32 Area | Old Rod | 5 | 70% | Swarm Yes |
| Crystal | Johto Route 32 Area | Old Rod | 10 | 70% | Swarm No |
| Crystal | Johto Route 32 Area | Good Rod | 20 | 35% | Swarm No |
| Crystal | Johto Route 32 Area | Super Rod | 40 | 20% | Swarm No |
| Crystal | Johto Route 34 Area | Old Rod | 10 | 70% | — |
| Crystal | Johto Route 34 Area | Good Rod | 20 | 35% | Time Day |
| Crystal | Johto Route 34 Area | Good Rod | 20 | 35% | Time ♂orning |
| Crystal | Johto Route 34 Area | Good Rod | 20 | 35% | Time Night |
| Crystal | Johto Route 35 Area | Old Rod | 10 | 70% | — |
| Crystal | Johto Route 35 Area | Good Rod | 20 | 35% | — |
| Crystal | Johto Route 35 Area | Super Rod | 40 | 20% | — |
| Crystal | Johto Route 42 Area | Old Rod | 10 | 70% | — |
| Crystal | Johto Route 42 Area | Good Rod | 20 | 35% | — |
| Crystal | Johto Route 42 Area | Super Rod | 40 | 20% | — |
| Crystal | Johto Route 43 Area | Old Rod | 10 | 70% | — |
| Crystal | Johto Route 43 Area | Surf | 10–14 | 10% | — |
| Crystal | Johto Route 43 Area | Surf | 15–19 | 30% | — |
| Crystal | Johto Route 43 Area | Good Rod | 20 | 35% | — |
| Crystal | Johto Route 43 Area | Surf | 20–24 | 60% | — |
| Crystal | Johto Route 43 Area | Super Rod | 40 | 20% | — |
| Crystal | Johto Route 44 Area | Old Rod | 10 | 70% | — |
| Crystal | Johto Route 44 Area | Good Rod | 20 | 35% | — |
| Crystal | Johto Route 44 Area | Super Rod | 40 | 20% | — |
| Crystal | Johto Route 45 Area | Surf | 5–9 | 10% | — |
| Crystal | Johto Route 45 Area | Old Rod | 10 | 70% | — |
| Crystal | Johto Route 45 Area | Surf | 15–19 | 30% | — |
| Crystal | Johto Route 45 Area | Good Rod | 20 | 35% | — |
| Crystal | Johto Route 45 Area | Surf | 20–24 | 60% | — |
| Crystal | Johto Route 45 Area | Super Rod | 40 | 40% | — |
| Crystal | Johto Sea Route 40 Area | Old Rod | 10 | 70% | — |
| Crystal | Johto Sea Route 40 Area | Good Rod | 20 | 35% | Time Day |
| Crystal | Johto Sea Route 40 Area | Good Rod | 20 | 35% | Time ♂orning |
| Crystal | Johto Sea Route 40 Area | Good Rod | 20 | 35% | Time Night |
| Crystal | Johto Sea Route 41 Area | Old Rod | 10 | 70% | — |
| Crystal | Johto Sea Route 41 Area | Good Rod | 20 | 35% | — |
| Crystal | Kanto Route 10 Area | Old Rod | 10 | 70% | — |
| Crystal | Kanto Route 10 Area | Good Rod | 20 | 35% | — |
| Crystal | Kanto Route 10 Area | Super Rod | 40 | 20% | — |
| Crystal | Kanto Route 12 Area | Old Rod | 10 | 70% | — |
| Crystal | Kanto Route 12 Area | Good Rod | 20 | 35% | — |
| Crystal | Kanto Route 12 Area | Super Rod | 40 | 20% | — |
| Crystal | Kanto Route 13 Area | Old Rod | 10 | 70% | — |
| Crystal | Kanto Route 13 Area | Good Rod | 20 | 35% | — |
| Crystal | Kanto Route 13 Area | Super Rod | 40 | 20% | — |
| Crystal | Kanto Route 22 Area | Old Rod | 10 | 70% | — |
| Crystal | Kanto Route 22 Area | Good Rod | 20 | 35% | — |
| Crystal | Kanto Route 22 Area | Super Rod | 40 | 20% | — |
| Crystal | Kanto Route 24 Area | Old Rod | 10 | 70% | — |
| Crystal | Kanto Route 24 Area | Good Rod | 20 | 35% | — |
| Crystal | Kanto Route 24 Area | Super Rod | 40 | 20% | — |
| Crystal | Kanto Route 25 Area | Old Rod | 10 | 70% | — |
| Crystal | Kanto Route 25 Area | Good Rod | 20 | 35% | — |
| Crystal | Kanto Route 25 Area | Super Rod | 40 | 20% | — |
| Crystal | Kanto Route 26 Area | Old Rod | 10 | 70% | — |
| Crystal | Kanto Route 26 Area | Good Rod | 20 | 35% | — |
| Crystal | Kanto Route 27 Area | Old Rod | 10 | 70% | — |
| Crystal | Kanto Route 27 Area | Good Rod | 20 | 35% | — |
| Crystal | Kanto Route 28 Area | Old Rod | 10 | 70% | — |
| Crystal | Kanto Route 28 Area | Good Rod | 20 | 35% | — |
| Crystal | Kanto Route 28 Area | Super Rod | 40 | 20% | — |
| Crystal | Kanto Route 6 Area | Old Rod | 10 | 70% | — |
| Crystal | Kanto Route 6 Area | Good Rod | 20 | 35% | — |
| Crystal | Kanto Route 6 Area | Super Rod | 40 | 20% | — |
| Crystal | Kanto Route 9 Area | Old Rod | 10 | 70% | — |
| Crystal | Kanto Route 9 Area | Good Rod | 20 | 35% | — |
| Crystal | Kanto Route 9 Area | Super Rod | 40 | 20% | — |
| Crystal | Kanto Sea Route 19 Area | Old Rod | 10 | 70% | — |
| Crystal | Kanto Sea Route 19 Area | Good Rod | 20 | 35% | Time Day |
| Crystal | Kanto Sea Route 19 Area | Good Rod | 20 | 35% | Time ♂orning |
| Crystal | Kanto Sea Route 19 Area | Good Rod | 20 | 35% | Time Night |
| Crystal | Kanto Sea Route 20 Area | Old Rod | 10 | 70% | — |
| Crystal | Kanto Sea Route 20 Area | Good Rod | 20 | 35% | — |
| Crystal | Kanto Sea Route 21 Area | Old Rod | 10 | 70% | — |
| Crystal | Kanto Sea Route 21 Area | Good Rod | 20 | 35% | — |
| Crystal | Lake Of Rage Area | Old Rod | 10 | 70% | — |
| Crystal | Lake Of Rage Area | Surf | 10–14 | 30% | — |
| Crystal | Lake Of Rage Area | Surf | 15–19 | 60% | — |
| Crystal | Lake Of Rage Area | Good Rod | 20 | 35% | — |
| Crystal | Lake Of Rage Area | Super Rod | 40 | 40% | — |
| Crystal | Mt Silver 2f | Old Rod | 10 | 70% | — |
| Crystal | Mt Silver 2f | Good Rod | 20 | 35% | — |
| Crystal | Mt Silver 2f | Super Rod | 40 | 20% | — |
| Crystal | Mt Silver Outside | Old Rod | 10 | 70% | — |
| Crystal | Mt Silver Outside | Good Rod | 20 | 35% | — |
| Crystal | Mt Silver Outside | Super Rod | 40 | 20% | — |
| Crystal | Mt ♂ortar 1f | Old Rod | 10 | 70% | — |
| Crystal | Mt ♂ortar 1f | Good Rod | 20 | 35% | — |
| Crystal | Mt ♂ortar 1f | Super Rod | 40 | 20% | — |
| Crystal | Mt ♂ortar B1f | Old Rod | 10 | 70% | — |
| Crystal | Mt ♂ortar B1f | Good Rod | 20 | 35% | — |
| Crystal | Mt ♂ortar B1f | Super Rod | 40 | 20% | — |
| Crystal | Mt ♂ortar Upper Cave | Old Rod | 10 | 70% | — |
| Crystal | Mt ♂ortar Upper Cave | Good Rod | 20 | 35% | — |
| Crystal | Mt ♂ortar Upper Cave | Super Rod | 40 | 20% | — |
| Crystal | New Bark Town Area | Old Rod | 10 | 70% | — |
| Crystal | New Bark Town Area | Good Rod | 20 | 35% | — |
| Crystal | Olivine City Area | Old Rod | 10 | 70% | — |
| Crystal | Olivine City Area | Good Rod | 20 | 35% | Time Day |
| Crystal | Olivine City Area | Good Rod | 20 | 35% | Time ♂orning |
| Crystal | Olivine City Area | Good Rod | 20 | 35% | Time Night |
| Crystal | Pallet Town Area | Old Rod | 10 | 70% | — |
| Crystal | Pallet Town Area | Good Rod | 20 | 35% | — |
| Crystal | Ruins Of Alph Outside | Old Rod | 10 | 70% | — |
| Crystal | Ruins Of Alph Outside | Good Rod | 20 | 35% | — |
| Crystal | Ruins Of Alph Outside | Super Rod | 40 | 20% | — |
| Crystal | Slowpoke Well 1f | Old Rod | 10 | 70% | — |
| Crystal | Slowpoke Well 1f | Good Rod | 20 | 35% | — |
| Crystal | Slowpoke Well 1f | Super Rod | 40 | 20% | — |
| Crystal | Slowpoke Well B1f | Old Rod | 10 | 70% | — |
| Crystal | Slowpoke Well B1f | Good Rod | 20 | 35% | — |
| Crystal | Slowpoke Well B1f | Super Rod | 40 | 20% | — |
| Crystal | Tohjo ♀alls Area | Old Rod | 10 | 70% | — |
| Crystal | Tohjo ♀alls Area | Good Rod | 20 | 35% | — |
| Crystal | Tohjo ♀alls Area | Super Rod | 40 | 20% | — |
| Crystal | Union Cave 1f | Old Rod | 10 | 70% | — |
| Crystal | Union Cave 1f | Good Rod | 20 | 35% | — |
| Crystal | Union Cave 1f | Super Rod | 40 | 20% | — |
| Crystal | Union Cave B1f | Old Rod | 10 | 70% | — |
| Crystal | Union Cave B1f | Good Rod | 20 | 35% | — |
| Crystal | Union Cave B1f | Super Rod | 40 | 20% | — |
| Crystal | Union Cave B2f | Old Rod | 10 | 70% | — |
| Crystal | Union Cave B2f | Good Rod | 20 | 35% | Time Day |
| Crystal | Union Cave B2f | Good Rod | 20 | 35% | Time ♂orning |
| Crystal | Union Cave B2f | Good Rod | 20 | 35% | Time Night |
| Crystal | Vermilion City Area | Old Rod | 10 | 70% | — |
| Crystal | Vermilion City Area | Good Rod | 20 | 35% | — |
| Crystal | Vermilion City Ss Anne Dock | Old Rod | 10 | 70% | — |
| Crystal | Vermilion City Ss Anne Dock | Good Rod | 20 | 35% | — |
| Crystal | Violet City Area | Old Rod | 10 | 70% | — |
| Crystal | Violet City Area | Good Rod | 20 | 35% | — |
| Crystal | Violet City Area | Super Rod | 40 | 20% | — |
| Crystal | Whirl Islands 1f | Old Rod | 10 | 70% | — |
| Crystal | Whirl Islands 1f | Good Rod | 20 | 35% | — |
| Crystal | Whirl Islands B2f | Old Rod | 10 | 70% | — |
| Crystal | Whirl Islands B2f | Good Rod | 20 | 35% | — |
| Crystal | Whirl Islands B3f | Old Rod | 10 | 70% | — |
| Crystal | Whirl Islands B3f | Good Rod | 20 | 35% | — |
| Diamond | Canalave City Area | Old Rod | 3–7 | 30% | — |
| Diamond | Canalave City Area | Old Rod | 4–6 | 60% | — |
| Diamond | Canalave City Area | Old Rod | 5–10 | 5% | — |
| Diamond | Canalave City Area | Good Rod | 10–25 | 15% | — |
| Diamond | Canalave City Area | Good Rod | 15–20 | 40% | — |
| Diamond | Celestic Town Area | Old Rod | 3–7 | 30% | — |
| Diamond | Celestic Town Area | Old Rod | 4–6 | 60% | — |
| Diamond | Celestic Town Area | Old Rod | 5–10 | 5% | — |
| Diamond | Celestic Town Area | Good Rod | 10–25 | 15% | — |
| Diamond | Celestic Town Area | Good Rod | 15–20 | 40% | — |
| Diamond | Eterna City Area | Old Rod | 3–7 | 30% | — |
| Diamond | Eterna City Area | Old Rod | 4–6 | 60% | — |
| Diamond | Eterna City Area | Old Rod | 5–10 | 5% | — |
| Diamond | Eterna City Area | Good Rod | 10–25 | 15% | — |
| Diamond | Eterna City Area | Good Rod | 15–20 | 40% | — |
| Diamond | Fuego Ironworks Area | Old Rod | 3–7 | 30% | — |
| Diamond | Fuego Ironworks Area | Old Rod | 4–6 | 60% | — |
| Diamond | Fuego Ironworks Area | Old Rod | 5–10 | 5% | — |
| Diamond | Fuego Ironworks Area | Good Rod | 10–25 | 15% | — |
| Diamond | Fuego Ironworks Area | Good Rod | 15–20 | 40% | — |
| Diamond | Great ♂arsh Area 1 | Old Rod | 3–7 | 30% | — |
| Diamond | Great ♂arsh Area 1 | Old Rod | 4–6 | 60% | — |
| Diamond | Great ♂arsh Area 1 | Old Rod | 5–10 | 5% | — |
| Diamond | Great ♂arsh Area 1 | Good Rod | 10–25 | 15% | — |
| Diamond | Great ♂arsh Area 1 | Good Rod | 15–20 | 40% | — |
| Diamond | Great ♂arsh Area 2 | Old Rod | 3–7 | 30% | — |
| Diamond | Great ♂arsh Area 2 | Old Rod | 4–6 | 60% | — |
| Diamond | Great ♂arsh Area 2 | Old Rod | 5–10 | 5% | — |
| Diamond | Great ♂arsh Area 2 | Good Rod | 10–25 | 15% | — |
| Diamond | Great ♂arsh Area 2 | Good Rod | 15–20 | 40% | — |
| Diamond | Great ♂arsh Area 3 | Old Rod | 3–7 | 30% | — |
| Diamond | Great ♂arsh Area 3 | Old Rod | 4–6 | 60% | — |
| Diamond | Great ♂arsh Area 3 | Old Rod | 5–10 | 5% | — |
| Diamond | Great ♂arsh Area 3 | Good Rod | 10–25 | 15% | — |
| Diamond | Great ♂arsh Area 3 | Good Rod | 15–20 | 40% | — |
| Diamond | Great ♂arsh Area 4 | Old Rod | 3–7 | 30% | — |
| Diamond | Great ♂arsh Area 4 | Old Rod | 4–6 | 60% | — |
| Diamond | Great ♂arsh Area 4 | Old Rod | 5–10 | 5% | — |
| Diamond | Great ♂arsh Area 4 | Good Rod | 10–25 | 15% | — |
| Diamond | Great ♂arsh Area 4 | Good Rod | 15–20 | 40% | — |
| Diamond | Great ♂arsh Area 6 | Old Rod | 3–7 | 30% | — |
| Diamond | Great ♂arsh Area 6 | Old Rod | 4–6 | 60% | — |
| Diamond | Great ♂arsh Area 6 | Old Rod | 5–10 | 5% | — |
| Diamond | Great ♂arsh Area 6 | Good Rod | 10–25 | 15% | — |
| Diamond | Great ♂arsh Area 6 | Good Rod | 15–20 | 40% | — |
| Diamond | Iron Island Area | Old Rod | 3–7 | 30% | — |
| Diamond | Iron Island Area | Old Rod | 4–6 | 60% | — |
| Diamond | Iron Island Area | Old Rod | 5–10 | 5% | — |
| Diamond | Iron Island Area | Good Rod | 10–25 | 15% | — |
| Diamond | Iron Island Area | Good Rod | 15–20 | 40% | — |
| Diamond | Lake Acuity Area | Old Rod | 3–6 | 60% | — |
| Diamond | Lake Acuity Area | Old Rod | 4–7 | 30% | — |
| Diamond | Lake Acuity Area | Old Rod | 5–10 | 5% | — |
| Diamond | Lake Acuity Area | Good Rod | 10–25 | 15% | — |
| Diamond | Lake Acuity Area | Good Rod | 15–20 | 40% | — |
| Diamond | Lake Valor Area | Old Rod | 3–6 | 60% | — |
| Diamond | Lake Valor Area | Old Rod | 4–7 | 30% | — |
| Diamond | Lake Valor Area | Old Rod | 5–10 | 5% | — |
| Diamond | Lake Valor Area | Good Rod | 10–25 | 15% | — |
| Diamond | Lake Valor Area | Good Rod | 15–20 | 40% | — |
| Diamond | Lake Verity After Galactic Intervention | Old Rod | 3–6 | 60% | — |
| Diamond | Lake Verity After Galactic Intervention | Old Rod | 4–7 | 30% | — |
| Diamond | Lake Verity After Galactic Intervention | Old Rod | 5–10 | 5% | — |
| Diamond | Lake Verity After Galactic Intervention | Good Rod | 10–25 | 15% | — |
| Diamond | Lake Verity After Galactic Intervention | Good Rod | 15–20 | 40% | — |
| Diamond | Lake Verity Before Galactic Intervention | Old Rod | 3–6 | 60% | — |
| Diamond | Lake Verity Before Galactic Intervention | Old Rod | 4–7 | 30% | — |
| Diamond | Lake Verity Before Galactic Intervention | Old Rod | 5–10 | 5% | — |
| Diamond | Lake Verity Before Galactic Intervention | Good Rod | 10–25 | 15% | — |
| Diamond | Lake Verity Before Galactic Intervention | Good Rod | 15–20 | 40% | — |
| Diamond | Mt Coronet 1f Route 207 | Old Rod | 3–7 | 30% | — |
| Diamond | Mt Coronet 1f Route 207 | Old Rod | 4–6 | 60% | — |
| Diamond | Mt Coronet 1f Route 207 | Old Rod | 5–10 | 5% | — |
| Diamond | Mt Coronet 1f Route 207 | Good Rod | 10–25 | 15% | — |
| Diamond | Mt Coronet 1f Route 207 | Good Rod | 15–20 | 40% | — |
| Diamond | Mt Coronet 4f | Old Rod | 3–7 | 30% | — |
| Diamond | Mt Coronet 4f | Old Rod | 4–6 | 60% | — |
| Diamond | Mt Coronet 4f | Old Rod | 5–10 | 5% | — |
| Diamond | Mt Coronet 4f | Good Rod | 10–25 | 15% | — |
| Diamond | Mt Coronet 4f | Good Rod | 15–20 | 40% | — |
| Diamond | Mt Coronet B1f | Old Rod | 3–7 | 30% | — |
| Diamond | Mt Coronet B1f | Old Rod | 4–6 | 60% | — |
| Diamond | Mt Coronet B1f | Old Rod | 5–10 | 5% | — |
| Diamond | Mt Coronet B1f | Good Rod | 10–25 | 15% | — |
| Diamond | Mt Coronet B1f | Good Rod | 15–20 | 40% | — |
| Diamond | Oreburgh Gate B1f | Old Rod | 3–7 | 30% | — |
| Diamond | Oreburgh Gate B1f | Old Rod | 4–6 | 60% | — |
| Diamond | Oreburgh Gate B1f | Old Rod | 5–10 | 5% | — |
| Diamond | Oreburgh Gate B1f | Good Rod | 10–25 | 15% | — |
| Diamond | Oreburgh Gate B1f | Good Rod | 15–20 | 40% | — |
| Diamond | Pastoria City Area | Old Rod | 3–7 | 30% | — |
| Diamond | Pastoria City Area | Old Rod | 4–6 | 60% | — |
| Diamond | Pastoria City Area | Old Rod | 5–10 | 5% | — |
| Diamond | Pastoria City Area | Good Rod | 10–25 | 15% | — |
| Diamond | Pastoria City Area | Good Rod | 15–20 | 40% | — |
| Diamond | Ravaged Path Area | Old Rod | 3–7 | 30% | — |
| Diamond | Ravaged Path Area | Old Rod | 4–6 | 60% | — |
| Diamond | Ravaged Path Area | Old Rod | 5–10 | 5% | — |
| Diamond | Ravaged Path Area | Good Rod | 10–25 | 15% | — |
| Diamond | Ravaged Path Area | Good Rod | 15–20 | 40% | — |
| Diamond | Resort Area Area | Old Rod | 3–7 | 30% | — |
| Diamond | Resort Area Area | Old Rod | 4–6 | 60% | — |
| Diamond | Resort Area Area | Old Rod | 5–10 | 5% | — |
| Diamond | Resort Area Area | Good Rod | 10–25 | 15% | — |
| Diamond | Resort Area Area | Good Rod | 15–20 | 40% | — |
| Diamond | Sendoff Spring Area | Old Rod | 3–6 | 60% | — |
| Diamond | Sendoff Spring Area | Old Rod | 4–7 | 30% | — |
| Diamond | Sendoff Spring Area | Old Rod | 5–10 | 5% | — |
| Diamond | Sendoff Spring Area | Good Rod | 10–25 | 15% | — |
| Diamond | Sendoff Spring Area | Good Rod | 15–20 | 40% | — |
| Diamond | Sinnoh Pokemon League Area | Old Rod | 3–7 | 30% | — |
| Diamond | Sinnoh Pokemon League Area | Old Rod | 4–6 | 60% | — |
| Diamond | Sinnoh Pokemon League Area | Old Rod | 5–10 | 5% | — |
| Diamond | Sinnoh Pokemon League Area | Good Rod | 10–25 | 15% | — |
| Diamond | Sinnoh Pokemon League Area | Good Rod | 15–20 | 40% | — |
| Diamond | Sinnoh Route 203 Area | Old Rod | 3–7 | 30% | — |
| Diamond | Sinnoh Route 203 Area | Old Rod | 4–6 | 60% | — |
| Diamond | Sinnoh Route 203 Area | Old Rod | 5–10 | 5% | — |
| Diamond | Sinnoh Route 203 Area | Good Rod | 10–25 | 15% | — |
| Diamond | Sinnoh Route 203 Area | Good Rod | 15–20 | 40% | — |
| Diamond | Sinnoh Route 204 North Towards ♀loaroma Town | Old Rod | 3–7 | 30% | — |
| Diamond | Sinnoh Route 204 North Towards ♀loaroma Town | Old Rod | 4–6 | 60% | — |
| Diamond | Sinnoh Route 204 North Towards ♀loaroma Town | Old Rod | 5–10 | 5% | — |
| Diamond | Sinnoh Route 204 North Towards ♀loaroma Town | Good Rod | 10–25 | 15% | — |
| Diamond | Sinnoh Route 204 North Towards ♀loaroma Town | Good Rod | 15–20 | 40% | — |
| Diamond | Sinnoh Route 204 South Towards Jubilife City | Old Rod | 3–7 | 30% | — |
| Diamond | Sinnoh Route 204 South Towards Jubilife City | Old Rod | 4–6 | 60% | — |
| Diamond | Sinnoh Route 204 South Towards Jubilife City | Old Rod | 5–10 | 5% | — |
| Diamond | Sinnoh Route 204 South Towards Jubilife City | Good Rod | 10–25 | 15% | — |
| Diamond | Sinnoh Route 204 South Towards Jubilife City | Good Rod | 15–20 | 40% | — |
| Diamond | Sinnoh Route 205 East Towards Eterna City | Old Rod | 3–7 | 30% | — |
| Diamond | Sinnoh Route 205 East Towards Eterna City | Old Rod | 4–6 | 60% | — |
| Diamond | Sinnoh Route 205 East Towards Eterna City | Old Rod | 5–10 | 5% | — |
| Diamond | Sinnoh Route 205 East Towards Eterna City | Good Rod | 10–25 | 15% | — |
| Diamond | Sinnoh Route 205 East Towards Eterna City | Good Rod | 15–20 | 40% | — |
| Diamond | Sinnoh Route 205 South Towards ♀loaroma Town | Old Rod | 3–7 | 30% | — |
| Diamond | Sinnoh Route 205 South Towards ♀loaroma Town | Old Rod | 4–6 | 60% | — |
| Diamond | Sinnoh Route 205 South Towards ♀loaroma Town | Old Rod | 5–10 | 5% | — |
| Diamond | Sinnoh Route 205 South Towards ♀loaroma Town | Good Rod | 10–25 | 15% | — |
| Diamond | Sinnoh Route 205 South Towards ♀loaroma Town | Good Rod | 15–20 | 40% | — |
| Diamond | Sinnoh Route 208 Area | Old Rod | 3–7 | 30% | — |
| Diamond | Sinnoh Route 208 Area | Old Rod | 4–6 | 60% | — |
| Diamond | Sinnoh Route 208 Area | Old Rod | 5–10 | 5% | — |
| Diamond | Sinnoh Route 208 Area | Good Rod | 10–25 | 15% | — |
| Diamond | Sinnoh Route 208 Area | Good Rod | 15–20 | 40% | — |
| Diamond | Sinnoh Route 209 Area | Old Rod | 3–7 | 30% | — |
| Diamond | Sinnoh Route 209 Area | Old Rod | 4–6 | 60% | — |
| Diamond | Sinnoh Route 209 Area | Old Rod | 5–10 | 5% | — |
| Diamond | Sinnoh Route 209 Area | Good Rod | 10–25 | 15% | — |
| Diamond | Sinnoh Route 209 Area | Good Rod | 15–20 | 40% | — |
| Diamond | Sinnoh Route 210 West Towards Celestic Town | Old Rod | 3–7 | 30% | — |
| Diamond | Sinnoh Route 210 West Towards Celestic Town | Old Rod | 4–6 | 60% | — |
| Diamond | Sinnoh Route 210 West Towards Celestic Town | Old Rod | 5–10 | 5% | — |
| Diamond | Sinnoh Route 210 West Towards Celestic Town | Good Rod | 10–25 | 15% | — |
| Diamond | Sinnoh Route 210 West Towards Celestic Town | Good Rod | 15–20 | 40% | — |
| Diamond | Sinnoh Route 212 East Towards Pastoria City | Old Rod | 3–7 | 30% | — |
| Diamond | Sinnoh Route 212 East Towards Pastoria City | Old Rod | 4–6 | 60% | — |
| Diamond | Sinnoh Route 212 East Towards Pastoria City | Old Rod | 5–10 | 5% | — |
| Diamond | Sinnoh Route 212 East Towards Pastoria City | Good Rod | 10–25 | 15% | — |
| Diamond | Sinnoh Route 212 East Towards Pastoria City | Good Rod | 15–20 | 40% | — |
| Diamond | Sinnoh Route 212 North Towards Hearthome City | Old Rod | 3–7 | 30% | — |
| Diamond | Sinnoh Route 212 North Towards Hearthome City | Old Rod | 4–6 | 60% | — |
| Diamond | Sinnoh Route 212 North Towards Hearthome City | Old Rod | 5–10 | 5% | — |
| Diamond | Sinnoh Route 212 North Towards Hearthome City | Good Rod | 10–25 | 15% | — |
| Diamond | Sinnoh Route 212 North Towards Hearthome City | Good Rod | 15–20 | 40% | — |
| Diamond | Sinnoh Route 213 Area | Old Rod | 3–7 | 30% | — |
| Diamond | Sinnoh Route 213 Area | Old Rod | 4–6 | 60% | — |
| Diamond | Sinnoh Route 213 Area | Old Rod | 5–10 | 5% | — |
| Diamond | Sinnoh Route 213 Area | Good Rod | 10–25 | 15% | — |
| Diamond | Sinnoh Route 213 Area | Good Rod | 15–20 | 40% | — |
| Diamond | Sinnoh Route 214 Area | Old Rod | 3–7 | 30% | — |
| Diamond | Sinnoh Route 214 Area | Old Rod | 4–6 | 60% | — |
| Diamond | Sinnoh Route 214 Area | Old Rod | 5–10 | 5% | — |
| Diamond | Sinnoh Route 214 Area | Good Rod | 10–25 | 15% | — |
| Diamond | Sinnoh Route 214 Area | Good Rod | 15–20 | 40% | — |
| Diamond | Sinnoh Route 218 Area | Old Rod | 3–7 | 30% | — |
| Diamond | Sinnoh Route 218 Area | Old Rod | 4–6 | 60% | — |
| Diamond | Sinnoh Route 218 Area | Old Rod | 5–10 | 5% | — |
| Diamond | Sinnoh Route 218 Area | Good Rod | 10–25 | 15% | — |
| Diamond | Sinnoh Route 218 Area | Good Rod | 15–20 | 40% | — |
| Diamond | Sinnoh Route 219 Area | Old Rod | 3–7 | 30% | — |
| Diamond | Sinnoh Route 219 Area | Old Rod | 4–6 | 60% | — |
| Diamond | Sinnoh Route 219 Area | Old Rod | 5–10 | 5% | — |
| Diamond | Sinnoh Route 219 Area | Good Rod | 10–25 | 15% | — |
| Diamond | Sinnoh Route 219 Area | Good Rod | 15–20 | 40% | — |
| Diamond | Sinnoh Route 221 Area | Old Rod | 3–7 | 30% | — |
| Diamond | Sinnoh Route 221 Area | Old Rod | 4–6 | 60% | — |
| Diamond | Sinnoh Route 221 Area | Old Rod | 5–10 | 5% | — |
| Diamond | Sinnoh Route 221 Area | Good Rod | 10–25 | 15% | — |
| Diamond | Sinnoh Route 221 Area | Good Rod | 15–20 | 40% | — |
| Diamond | Sinnoh Route 222 Area | Old Rod | 3–7 | 30% | — |
| Diamond | Sinnoh Route 222 Area | Old Rod | 4–6 | 60% | — |
| Diamond | Sinnoh Route 222 Area | Old Rod | 5–10 | 5% | — |
| Diamond | Sinnoh Route 222 Area | Good Rod | 10–25 | 15% | — |
| Diamond | Sinnoh Route 222 Area | Good Rod | 15–20 | 40% | — |
| Diamond | Sinnoh Route 224 Area | Old Rod | 3–7 | 30% | — |
| Diamond | Sinnoh Route 224 Area | Old Rod | 4–6 | 60% | — |
| Diamond | Sinnoh Route 224 Area | Old Rod | 5–10 | 5% | — |
| Diamond | Sinnoh Route 224 Area | Good Rod | 10–25 | 15% | — |
| Diamond | Sinnoh Route 224 Area | Good Rod | 15–20 | 40% | — |
| Diamond | Sinnoh Route 225 Area | Old Rod | 3–7 | 30% | — |
| Diamond | Sinnoh Route 225 Area | Old Rod | 4–6 | 60% | — |
| Diamond | Sinnoh Route 225 Area | Old Rod | 5–10 | 5% | — |
| Diamond | Sinnoh Route 225 Area | Good Rod | 10–25 | 15% | — |
| Diamond | Sinnoh Route 225 Area | Good Rod | 15–20 | 40% | — |
| Diamond | Sinnoh Route 227 Area | Old Rod | 3–7 | 30% | — |
| Diamond | Sinnoh Route 227 Area | Old Rod | 4–6 | 60% | — |
| Diamond | Sinnoh Route 227 Area | Old Rod | 5–10 | 5% | — |
| Diamond | Sinnoh Route 227 Area | Good Rod | 10–25 | 15% | — |
| Diamond | Sinnoh Route 227 Area | Good Rod | 15–20 | 40% | — |
| Diamond | Sinnoh Route 228 Area | Old Rod | 3–7 | 30% | — |
| Diamond | Sinnoh Route 228 Area | Old Rod | 4–6 | 60% | — |
| Diamond | Sinnoh Route 228 Area | Old Rod | 5–10 | 5% | — |
| Diamond | Sinnoh Route 228 Area | Good Rod | 10–25 | 15% | — |
| Diamond | Sinnoh Route 228 Area | Good Rod | 15–20 | 40% | — |
| Diamond | Sinnoh Route 229 Area | Old Rod | 3–7 | 30% | — |
| Diamond | Sinnoh Route 229 Area | Old Rod | 4–6 | 60% | — |
| Diamond | Sinnoh Route 229 Area | Old Rod | 5–10 | 5% | — |
| Diamond | Sinnoh Route 229 Area | Good Rod | 10–25 | 15% | — |
| Diamond | Sinnoh Route 229 Area | Good Rod | 15–20 | 40% | — |
| Diamond | Sinnoh Sea Route 220 Area | Old Rod | 3–7 | 30% | — |
| Diamond | Sinnoh Sea Route 220 Area | Old Rod | 4–6 | 60% | — |
| Diamond | Sinnoh Sea Route 220 Area | Old Rod | 5–10 | 5% | — |
| Diamond | Sinnoh Sea Route 220 Area | Good Rod | 10–25 | 15% | — |
| Diamond | Sinnoh Sea Route 220 Area | Good Rod | 15–20 | 40% | — |
| Diamond | Sinnoh Sea Route 223 Area | Old Rod | 3–7 | 30% | — |
| Diamond | Sinnoh Sea Route 223 Area | Old Rod | 4–6 | 60% | — |
| Diamond | Sinnoh Sea Route 223 Area | Old Rod | 5–10 | 5% | — |
| Diamond | Sinnoh Sea Route 223 Area | Good Rod | 10–25 | 15% | — |
| Diamond | Sinnoh Sea Route 223 Area | Good Rod | 15–20 | 40% | — |
| Diamond | Sinnoh Sea Route 226 Area | Old Rod | 3–7 | 30% | — |
| Diamond | Sinnoh Sea Route 226 Area | Old Rod | 4–6 | 60% | — |
| Diamond | Sinnoh Sea Route 226 Area | Old Rod | 5–10 | 5% | — |
| Diamond | Sinnoh Sea Route 226 Area | Good Rod | 10–25 | 15% | — |
| Diamond | Sinnoh Sea Route 226 Area | Good Rod | 15–20 | 40% | — |
| Diamond | Sinnoh Sea Route 230 Area | Old Rod | 3–7 | 30% | — |
| Diamond | Sinnoh Sea Route 230 Area | Old Rod | 4–6 | 60% | — |
| Diamond | Sinnoh Sea Route 230 Area | Old Rod | 5–10 | 5% | — |
| Diamond | Sinnoh Sea Route 230 Area | Good Rod | 10–25 | 15% | — |
| Diamond | Sinnoh Sea Route 230 Area | Good Rod | 15–20 | 40% | — |
| Diamond | Sinnoh Victory Road B1f | Old Rod | 3–7 | 30% | — |
| Diamond | Sinnoh Victory Road B1f | Old Rod | 4–6 | 60% | — |
| Diamond | Sinnoh Victory Road B1f | Old Rod | 5–10 | 5% | — |
| Diamond | Sinnoh Victory Road B1f | Good Rod | 10–25 | 15% | — |
| Diamond | Sinnoh Victory Road B1f | Good Rod | 15–20 | 40% | — |
| Diamond | Sinnoh Victory Road Inside B1f | Old Rod | 3–7 | 30% | — |
| Diamond | Sinnoh Victory Road Inside B1f | Old Rod | 4–6 | 60% | — |
| Diamond | Sinnoh Victory Road Inside B1f | Old Rod | 5–10 | 5% | — |
| Diamond | Sinnoh Victory Road Inside B1f | Good Rod | 10–25 | 15% | — |
| Diamond | Sinnoh Victory Road Inside B1f | Good Rod | 15–20 | 40% | — |
| Diamond | Sunyshore City Area | Old Rod | 3–7 | 30% | — |
| Diamond | Sunyshore City Area | Old Rod | 4–6 | 60% | — |
| Diamond | Sunyshore City Area | Old Rod | 5–10 | 5% | — |
| Diamond | Sunyshore City Area | Good Rod | 10–25 | 15% | — |
| Diamond | Sunyshore City Area | Good Rod | 15–20 | 40% | — |
| Diamond | Twinleaf Town Area | Old Rod | 3–7 | 30% | — |
| Diamond | Twinleaf Town Area | Old Rod | 4–6 | 60% | — |
| Diamond | Twinleaf Town Area | Old Rod | 5–10 | 5% | — |
| Diamond | Twinleaf Town Area | Good Rod | 10–25 | 15% | — |
| Diamond | Twinleaf Town Area | Good Rod | 15–20 | 40% | — |
| Diamond | Valley Windworks Area | Old Rod | 3–7 | 30% | — |
| Diamond | Valley Windworks Area | Old Rod | 4–6 | 60% | — |
| Diamond | Valley Windworks Area | Old Rod | 5–10 | 5% | — |
| Diamond | Valley Windworks Area | Good Rod | 10–25 | 15% | — |
| Diamond | Valley Windworks Area | Good Rod | 15–20 | 40% | — |
| Emerald | Abandoned Ship Area | Old Rod | 5–10 | 70% | — |
No encounter records match these filters.
Magikarp Pokédex moves
The Magikarp Pokédex lists 6 moves below. Use the filters to narrow the list by move name, learning method, type or category. Move availability can differ between games and generations, so check the relevant game details when planning a specific moveset.
Magikarp move explorer
6 moves shown
| Level | Move | Type | Category | Power | Accuracy | PP | Method |
|---|---|---|---|---|---|---|---|
| 1 | Splash | NORMAL | Status | — | — | 40 | Level Up |
| 15 | Tackle | NORMAL | Physical | 40 | 100 | 35 | Level Up |
| 25 | Flail | NORMAL | Physical | — | 100 | 15 | Level Up |
| — | Bounce | Physical | 85 | 85 | 5 | Machine | |
| — | Hydro Pump | WATER | Special | 110 | 80 | 5 | Machine |
| — | Bounce | Physical | 85 | 85 | 5 | Tutor |
No moves match these filters.
Magikarp Pokédex entries
The Magikarp Pokédex entries below let you compare how Magikarp has been described across different Pokémon games. Pokédex wording often changes between versions, so reading the entries together is a useful way to see how its description has evolved across the series.
Magikarp Pokédex entries
In the distant past, it was somewhat stronger than the horribly weak descendants that exist today.
In the distant past, it was somewhat stronger than the horribly weak descendants that exist today.
Famous for being very unreliable. It can be found swimming in seas, lakes, rivers and shallow puddles.
An underpowered, pathetic POKéMON. It may jump high on rare occasions, but never more than seven feet.
For no reason, it jumps and splashes about, making it easy for predators like PIDGEOTTO to catch it mid-jump.
This weak and pathetic POKéMON gets easily pushed along rivers when there are strong currents.
MAGIKARP is a pathetic excuse for a POKéMON that is only capable of flopping and splashing. This behavior prompted scientists to undertake research into it.
MAGIKARP is virtually useless in battle as it can only splash around. As a result, it is considered to be weak. However, it is actually a very hardy POKéMON that can survive in any body of water no matter how polluted it is.
Its swimming muscles are weak, so it is easily washed away by currents. In places where water pools, you can see many MAGIKARP deposited there by the flow.
It is virtually worthless in terms of both power and speed. It is the most weak and pathetic POKéMON in the world.
In the distant past, it was somewhat stronger than the horribly weak descendants that exist today.
It is said to be the world’s weakest Pokémon. No one knows why it has managed to survive.
It is unable to swim against even slow-moving currents. It always splashes about for some reason.
A MAGIKARP living for many years can leap a mountain using Splash. The move remains useless, though.
An underpowered, pathetic Pokémon. It may jump high on rare occasions, but usually not more than seven feet.
For no reason, it jumps and splashes about, making it easy for predators like PIDGEOTTO to catch it mid-jump.
A Magikarp living for many years can leap a mountain using Splash. The move remains useless, though.
A Magikarp living for many years can leap a mountain using Splash. The move remains useless, though.
A Magikarp living for many years can leap a mountain using Splash. The move remains useless, though.
A Magikarp living for many years can leap a mountain using Splash. The move remains useless, though.
It is virtually worthless in terms of both power and speed. It is the most weak and pathetic Pokémon in the world.
In the distant past, it was somewhat stronger than the horribly weak descendants that exist today.
Magikarp is a pathetic excuse for a Pokémon that is only capable of flopping and splashing. This behavior prompted scientists to undertake research into it.
Magikarp is virtually useless in battle as it can only splash around. As a result, it is considered to be weak. However, it is actually a very hardy Pokémon that can survive in any body of water no matter how polluted it is.
Although weak and helpless, this Pokémon is incredibly fertile. They exist in such multitudes, you’ll soon grow tired of seeing them.
Its reckless leaps make it easy pickings for predators. On the bright side, many Pokémon enjoy longer life spans, thanks to Magikarp.
In the distant past, they were fairly strong, but they have become gradually weaker over time.
Thanks to their strong hold on life, dirty water doesn’t bother them at all. They live in waters all over the world!
Famous for being very unreliable. It can be found swimming in seas, lakes, rivers, and shallow puddles.
Famous for being very unreliable. It can be found swimming in seas, lakes, rivers, and shallow puddles.
It is virtually worthless in terms of both power and speed. It is the most weak and pathetic Pokémon in the world.
This weak and pathetic Pokémon gets easily pushed along rivers when there are strong currents.
A feeble, pitiful imbecile of a Pokémon that is nonetheless very hardy. Unperturbed by turbid water, it can be found living in all sorts of places.
Browse the Pokémon Pokédex to explore more species, or visit Pokémon.com for official Pokémon news and franchise information.
More Pokémon like Magikarp


More Magikarp guides on The Click